Demo benchmark: the Iris data
This is a demo benchmark set up to show potential benchmark organizers what needs to be done to set up a benchmark on the EYRA Benchmark Platform and to allow potential benchmark participants to try submitting an algorithm. All data and code used for this demo can be found on github.
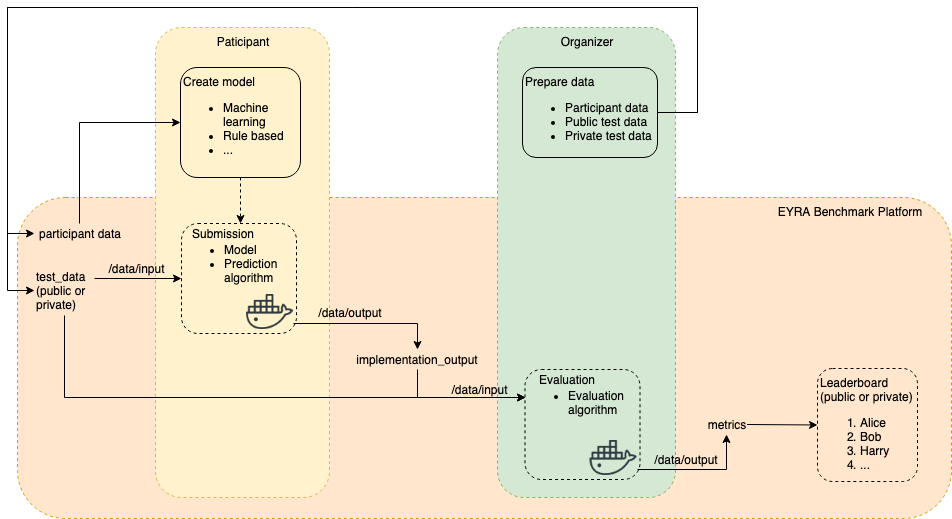
Overview of the EYRA Benchmark Platform.
The figure above shows how things work on the EYRA Benchmark Platform. It shows the data sets involved (participant data, which can or cannot be ground truth data, public test data, and optionally private test data). The figure also shows which parts of the benchmark are done by the platform and the parts that should be done by benchmark organizers and participants.
Benchmark organizers have to prepare different data sets, and make (some of them) make available (i.e., participant data and public test data). The EYRA Benchmark Platform is used for distributing the data, but data preparation should be done by the benchmark organizers themselves. To give a complete overview of what organizing a benchmark entails, the demo also explains how the different data sets were made.
Benchmark participants use the data provided by the benchmark organizers to
create a model.
As shown in the figure, model creation is the responsability of benchmark participants, and
is not done on the platform. Because we need a model to show how you can
submit to the Benchmark Platform, the demo specifies the model creation phase.
For the demo, a machine learning model is created, but it is possible
to create other types of models (WOULD BE NICE TO INSERT A REFERENCE HERE WITH EXAMPLES).
The demo model creation
code is in the model_creation directory. Usually, benchmarks have available
public test data that can be used to test the performance of the algorithm.
The demo benchmark uses the Iris dataset. The Iris dataset is a multivariate dataset containing measurements of the petals and sepals of different types of irises. The task is to predict the species of Iris (Setosa, Virginica, or Versicolor) based on the length and width of petals and sepals. The data set was randomly dived into three sets containing 50 samples each; one set is used as participant data, one set as public test data and one set as private test data. See under `For organizers: creating a benchmark`_ for more details about the creation of the datasets.
For participants: create a model
Get the data
Download the participant data and public test data from the demo benchmark.
- Go to the benchmark page.
- Click Data.
- Read the data description.
- Download the files.
Create a model
For the demo, we are keeping things simple and
train Support Vector Machines using scikit-learn. The code can be found in
model_creation/train.py and looks like:
1 2 3 4 5 6 7 8 9 10 11 12 13 14 15 16 17 18 19 20 21 22 23 24 25 26 27 28 29 30 31 32 33 34 35 36 37 38 39 40 41 42 43 44 45 46 47 48 49 50 51 52 | import os
import pandas as pd
from pathlib import Path
from joblib import dump
from sklearn import svm
def train_svm(in_file):
"""Train Support Vector Machines for the EYRA Demo Benchmark.
"""
# Read the training file
train = pd.read_csv(in_file)
train_data = train[['sepal_length', 'sepal_width', 'petal_length',
'petal_width']].values
train_targets = list(train['class'])
# Train the classifier
clf = svm.SVC(gamma=0.001, C=100.)
clf.fit(train_data, train_targets)
return clf
def save_model(clf, path):
dump(clf, path)
def predict(clf, test_data_file):
test = pd.read_csv(test_data_file)
return clf.predict(test.values)
if __name__ == "__main__":
# Create the model using a local copy of the data by typing:
# python model_creation/train.py
root = Path(__file__).absolute().parent.parent
participant_data = Path(root)/'data'/'iris_participant_data.csv'
out_file = Path(root)/'model_creation'/'iris_svm_model'
clf = train_svm(str(participant_data))
save_model(clf, str(out_file))
# Test whether the prediction mechanics work
test_file = root/'data'/'iris_public_test_data.csv'
result = predict(clf, str(test_file))
print(result)
|
In line 1-8 we import the Python libraries we need. The model creation code consist of two functions. Generally speaking, it is a good idea to divide your code into multiple functions, e.g., one for data preprocessing, one for training, and one for making predictions. The function for training the model starts on line 11. It has as input parameter the participant data file. The function reads the participant data (line 16) and puts it into the format that is required by machine learning algorithms in scikit-learn (lines 18-20). Next, a Support Vector classifier is trained (lines 23-24) and returned (line 26).
The save_model() function on line 29 takes as input a classifier and path
and then saves the model to that path, so it can be saved in the submission
docker container and used for predicting iris labels.
The predict() function on line 33 can be used to test whether predicting
labels given a test file works as expected. It has two input parameters, a
trained classifier and the path to a test data file. The function reads the
test data (line 34) and returns the predictions (line 36).
Note
When creating a model, feel free to use more functions and Python files if needed. For complicated code and if you want to be able to re-use for example data preprocessing functions, it might be a good idea to create your own Python package.
Todo
Add link to good tutorial about creating installable packages.
During implementation, you can test your model by running python train.py
in the model_creation directory. Line 38 makes sure the code below runs
only if you type that command. First we do some administrative work to determine
where the input data can be found and output should be written (lines 41-44).
Next, we train the classifier (line 46) and save the model to a file (line 47).
To test whether the model can be used for prediction, a variable containing the
path to a test data file is created (line 50). Next, the predict() function
is called and the result of that is printed to the screen.
The ouput produced by running the train script is:
$ python model_creation/train.py
['Iris-versicolor' 'Iris-virginica' 'Iris-virginica' 'Iris-virginica'
  'Iris-setosa' 'Iris-virginica' 'Iris-virginica' 'Iris-setosa'
  'Iris-setosa' 'Iris-versicolor' 'Iris-versicolor' 'Iris-setosa'
  'Iris-versicolor' 'Iris-versicolor' 'Iris-virginica' 'Iris-versicolor'
  'Iris-versicolor' 'Iris-versicolor' 'Iris-setosa' 'Iris-virginica'
  'Iris-virginica' 'Iris-setosa' 'Iris-versicolor' 'Iris-versicolor'
  'Iris-setosa' 'Iris-versicolor' 'Iris-setosa' 'Iris-versicolor'
  'Iris-virginica' 'Iris-versicolor' 'Iris-virginica' 'Iris-virginica'
  'Iris-virginica' 'Iris-setosa' 'Iris-virginica' 'Iris-virginica'
  'Iris-setosa' 'Iris-virginica' 'Iris-setosa' 'Iris-virginica'
  'Iris-setosa' 'Iris-setosa' 'Iris-setosa' 'Iris-setosa' 'Iris-versicolor'
  'Iris-versicolor' 'Iris-virginica' 'Iris-versicolor' 'Iris-setosa'
  'Iris-setosa']
This result tells us that the prediction mechanics work, but it doesn’t say anything about performance. If you would like to estimate performance of your model using participant data only, have a look at cross-validation.
For participants: create a submission
Every benchmark on the EYRA Benchmark Platform has a leaderboard that shows the performance of models according to the metric(s) proposed by the benchmark organizers. To have the benchmark platform calculate these metrics for our model, we need to create a submission Docker container that contains a prediction algorithm.
Prepare the Docker container and data
A boilerplate submission container can be generated using the EYRA Tools. Run eyra-generate
submission iris_svm (after installing the EYRA Tools),
cd into the directory that is generated (iris_svm),
and copy the data into the boilerplate container:
eyra-generate
submission iris_svm
cd iris_svm
cp ~/Downloads/iris_public_test_data.csv data/input/test_data
mkdir src/model
cp ~/code/eyra-iris-demo/model_creation/iris_svm_model src/model/iris_svm_model
Please note that the file paths from which files are copied need to be changed to the correct paths on your computer.
Todo
Resolve file naming issues (the submission container expects input files with specific names and should produce output files with specific names. These names are different from what the files are called now).
Implement the prediction algorithm
Implement the prediction algorithm in src/submission.py.
For the iris SVM this file looks like:
1 2 3 4 5 6 7 8 9 10 11 12 13 14 15 16 17 18 19 20 21 22 23 24 25 26 27 28 29 30 31 32 33 34 35 36 37 38 39 | import pandas as pd
from pathlib import Path
from joblib import load
from sklearn import svm
def iris_svm_predict(model_file, test_file, out_file):
# Load classifier
clf = load(model_file)
# Predict
pred = predict(clf, test_file)
# Write the output to file
output = pd.DataFrame()
output['class'] = pred
output.to_csv(out_file, index=None)
def predict(clf, test_data_file):
test = pd.read_csv(test_data_file)
return clf.predict(test.values)
if __name__ == "__main__":
# Run the algorithm on your local copy of the data by typing:
# python algorithm_scr/algorithm.py
model_file = Path(__file__).absolute().parent/'model'/'iris_svm_model'
# These are the default file paths (names) for input and output, so don't
# change them.
test_file = Path('data')/'input'/'test_data'
out_file = Path('data')/'output'
iris_svm_predict(model_file, test_file, out_file)
|
The prediction algorithm has two functions, iris_svm_predict() (line 9)
and predict() (line 22), which is the same as the predict() function
we used during model creation. The iris_svm_predict() function first loads
a model from file (line 11). It then predicts class
labels given the model and the test data file (line 14). On line 17-19 a
pandas DataFrame containing a single column called ‘class’ is created and
written to a csv file.
Starting from line 28, we see how these functions are called to generate the
implementation output used to calculate performance. Line 32 defines a
variable containing the path to the model file. Lines 36 and 37 define variables
that contain the paths to the test data and output respectively. Finally, on
line 39, the iris_svm_predict() function is called using the paths as
arguments.
You can test the prediction algorithm by running python src/submission.py
from the iris_svm directory. If everything works as
expected, we can start with preparing the Docker container.
Specify the dependencies
Add all Python libraries needed to run the prediction algorithm to requirements.txt.
For the demo we add pandas and scikit-learn.
Make sure the code can run inside the Docker container
Update src/run_submission.py, so it calls the iris_svm_predict() function:
1 2 3 4 5 6 7 8 9 10 11 12 13 14 15 16 17 18 19 20 21 | import os
from pathlib import Path
from submission import iris_svm_predict
class Submission(object):
def run(self, test_file, out_file):
# Additional data required by the prediction algorithm
model_file = Path(__file__).absolute().parent/'model'/'iris_svm_model'
iris_svm_predict(model_file, test_file, out_file)
# Please do not change anything below
if __name__ == "__main__":
# These are the default file paths (names) for input and output
test_file = Path('/')/'data'/'input'/'test_data'
out_file = Path('/')/'data'/'output'
Submission().run(test_file, out_file)
|
Because the code for the prediction algorithm is already done, we only need to
make a few changes to the boilerplate code. Lines 1-4 contain the imports.
On line 4 we import the iris_svm_predict() function from
src/submission.py. On line 5, a class Submission is defined
that has a single method run(). On the EYRA Benchmark Platform, this function
is executed, with specific input arguments for test_file and out_file,
as specified in lines 16-21. Lines 16-21 should not be changed. It specifies
the paths to which the input (test_file on line 18) and the output
(out_file on line 19) are mapped inside the Docker container. On line
21, a Submission object is created and its run() method is called
with the correct arguments. To make it work with our particular prediction
algorithm, we need to update the run() method. On line 9, we specify the
path to the model file. We copied this file into the src/model directory in
a previous step. Everything that is inside the
src directory is copied to the Docker container. So that is
where you can put data and code required by the prediction algorithm.
On line 12, we call iris_svm_predict() as before.
Test the Docker container
To build the Docker container and run the algorithm inside it, type
./test.sh. You get the following output:
$ ./test.sh
Sending build context to Docker daemon   38.4kB
Step 1/7 : FROM python:3.7-slim
3.7-slim: Pulling from library/python
1ab2bdfe9778: Pull complete
b5d689d9c40c: Pull complete
5b13ee99f0ea: Pull complete
d617973d7fa5: Pull complete
abfef9fe6f0b: Pull complete
Digest: sha256:5f83c6d40f9e9696d965785991e9b85e4baef189c7ad1078483d15a8657d6cc0
Status: Downloaded newer image for python:3.7-slim
---> f96c28b7013f
Step 2/7 : RUN mkdir -p /opt/src /input /output
---> Running in 0e4ae1aa1317
Removing intermediate container 0e4ae1aa1317
---> 20dd0c44733e
Step 3/7 : WORKDIR /opt/src
---> Running in ff5c0b8dbbb3
Removing intermediate container ff5c0b8dbbb3
---> ea18e90edb31
Step 4/7 : COPY requirements.txt /opt/src/
---> 7e097b17cd59
Step 5/7 : RUN python -m pip install -r requirements.txt
---> Running in 700020ca752d
Collecting pandas (from -r requirements.txt (line 1))
  Downloading https://files.pythonhosted.org/packages/7e/ab/ea76361f9d3e732e114adcd801d2820d5319c23d0ac5482fa3b412db217e/pandas-0.25.1-cp37-cp37m-manylinux1_x86_64.whl (10.4MB)
Collecting scikit-learn (from -r requirements.txt (line 2))
  Downloading https://files.pythonhosted.org/packages/9f/c5/e5267eb84994e9a92a2c6a6ee768514f255d036f3c8378acfa694e9f2c99/scikit_learn-0.21.3-cp37-cp37m-manylinux1_x86_64.whl (6.7MB)
Collecting numpy>=1.13.3 (from pandas->-r requirements.txt (line 1))
  Downloading https://files.pythonhosted.org/packages/25/eb/4ecf6b13897391cb07a4231e9d9c671b55dfbbf6f4a514a1a0c594f2d8d9/numpy-1.17.1-cp37-cp37m-manylinux1_x86_64.whl (20.3MB)
Collecting python-dateutil>=2.6.1 (from pandas->-r requirements.txt (line 1))
  Downloading https://files.pythonhosted.org/packages/41/17/c62faccbfbd163c7f57f3844689e3a78bae1f403648a6afb1d0866d87fbb/python_dateutil-2.8.0-py2.py3-none-any.whl (226kB)
Collecting pytz>=2017.2 (from pandas->-r requirements.txt (line 1))
  Downloading https://files.pythonhosted.org/packages/87/76/46d697698a143e05f77bec5a526bf4e56a0be61d63425b68f4ba553b51f2/pytz-2019.2-py2.py3-none-any.whl (508kB)
Collecting scipy>=0.17.0 (from scikit-learn->-r requirements.txt (line 2))
  Downloading https://files.pythonhosted.org/packages/94/7f/b535ec711cbcc3246abea4385d17e1b325d4c3404dd86f15fc4f3dba1dbb/scipy-1.3.1-cp37-cp37m-manylinux1_x86_64.whl (25.2MB)
Collecting joblib>=0.11 (from scikit-learn->-r requirements.txt (line 2))
  Downloading https://files.pythonhosted.org/packages/cd/c1/50a758e8247561e58cb87305b1e90b171b8c767b15b12a1734001f41d356/joblib-0.13.2-py2.py3-none-any.whl (278kB)
Collecting six>=1.5 (from python-dateutil>=2.6.1->pandas->-r requirements.txt (line 1))
  Downloading https://files.pythonhosted.org/packages/73/fb/00a976f728d0d1fecfe898238ce23f502a721c0ac0ecfedb80e0d88c64e9/six-1.12.0-py2.py3-none-any.whl
Installing collected packages: numpy, six, python-dateutil, pytz, pandas, scipy, joblib, scikit-learn
Successfully installed joblib-0.13.2 numpy-1.17.1 pandas-0.25.1 python-dateutil-2.8.0 pytz-2019.2 scikit-learn-0.21.3 scipy-1.3.1 six-1.12.0
Removing intermediate container 700020ca752d
---> 624723a5788f
Step 6/7 : ADD src /opt/src/
---> a46bb5006326
Step 7/7 : ENTRYPOINT "python" "-m" "run_submission"
---> Running in 12b22dbb283f
Removing intermediate container 12b22dbb283f
---> e119001e4684
Successfully built e119001e4684
Successfully tagged iris_svm:latest
Push the container to Docker Hub
If everything works as expected, you can push your container to Docker Hub:
./push.sh [version]
The ouput looks like:
$ ./push.sh 0.1.0
Sending build context to Docker daemon   38.4kB
Step 1/7 : FROM python:3.7-slim
---> f96c28b7013f
Step 2/7 : RUN mkdir -p /opt/src /input /output
---> Using cache
---> 20dd0c44733e
Step 3/7 : WORKDIR /opt/src
---> Using cache
---> ea18e90edb31
Step 4/7 : COPY requirements.txt /opt/src/
---> Using cache
---> 7e097b17cd59
Step 5/7 : RUN python -m pip install -r requirements.txt
---> Using cache
---> 624723a5788f
Step 6/7 : ADD src /opt/src/
---> Using cache
---> a46bb5006326
Step 7/7 : ENTRYPOINT "python" "-m" "run_submission"
---> Using cache
---> e119001e4684
Successfully built e119001e4684
Successfully tagged iris_svm:latest
Using tag: 0.1.0.
The push refers to repository [docker.io/eyra/iris_svm]
94c7819de05e: Pushed
3e64f1dd2a39: Pushed
764a69f7b78b: Pushed
56edc5355daa: Pushed
1808163506f4: Mounted from library/python
acd5d8dd0a11: Layer already exists
e18984c86e86: Layer already exists
523a99e3c88d: Layer already exists
1c95c77433e8: Layer already exists
0.1.0: digest: sha256:6f128fa8e62abecd98a36cea12a69071f4569b6cea031b84649f273afaa01fd3 size: 2205
Tip
You need to login to Docker Hub (docker login) before you can push the container.
Tip
If you want to use the push.sh script in the EYRA Iris Demo github
repository,
you need to replace eyra with your own Docker Hub account.
Submit the Docker container to the benchmark
On the EYRA Benchmark Platform, log in and go to the EYRA Iris Demo page and click ‘create submission’. Now you see a form:

First you need to specify the algorithm you are submitting. If your algorithm
isn’t in the dropdown list, you can create a new one by checking the ‘Create New
Algorithm’ box. The algorithm name should refer to the model you created. For
this demo we choose ‘Iris SVM’. Under ‘Name’ we put ‘Iris SVM 0.1.0’, ‘Version’
is ‘0.1.0’, and as ‘Docker image name’ we write eyra/iris_svm:0.1.0.
After clicking ‘Submit’ a job that will run the submission is created. This can take a little while. The submission is added to the ‘Results’ tab of the benchmark page. If the submission job is finished, you can see the performance of the algorithm:

For organizers: create a benchmark
To set up a benchmark on the EYRA Benchmark Platform you should contact the EYRA Benchmark team, and we will get back to you with more specific instructions. In addition to thorough and consise descriptions of the task, the data, the ground truth, and the evaluation metrics (see the benchmarks on the platform for examples), organizers need to provide:
- Participant data
- Public test data + public test ground truth: this is the data used for creating the public leaderboard.
- Private test data + private test ground truth: this is hold-out data, that is used for creating the private leaderboard.
- A Docker container containing the evaluation algorithm. Have a look at the tutorial to see how this is done.
Note
For demonstration purposes, the demo benchmark’s data is available on github. For a real benchmark, the public test ground truth, and the private test data and ground truth should not be shared with participants. This helps to make sure participants’ submissions focus on understanding the problem and advancing science rather than incrementally improving metrics.
A notebook specifying how the demo datasets were created is avaiable in the demo benchmark repository on github.
For organizers: create an evaluation
Benchmark organizers must submit a Docker container that compares the output of a submission to gold standard data and calculates performance.
Prepare the Docker container and data
We start with generating a boilerplate evaluation Docker container by running:
eyra-generate evaluation iris_eval -d <docker hub account>
Next, we copy data to the data/input directory:
cd iris_eval
cp ~/code/eyra-iris-demo/iris_public_test_gt.csv data/input/ground_truth
cp ~/code/eyra-iris-demo/iris_public_test_gt.csv data/input/implementation_output
Note
For convenience we are using the public test ground truth as implementation output. For real benchmarks it might be a good idea to (manually) create an implementation output file that is not the same as the ground truth.
Please note that the file paths from which files are copied need to be changed to the correct paths on your computer.
Todo
Resolve file naming issues (the submission container expects input files with specific names and should produce output files with specific names. These names are different from what the files are called now).
Implement the evaluation algorithm
Implement the evaluation algorithm in src/valuation.py.
For the demo benchmark this file looks like:
1 2 3 4 5 6 7 8 9 10 11 12 13 14 15 16 17 18 19 20 21 22 23 24 25 26 27 28 29 30 31 32 33 34 35 36 37 | import json
from pathlib import Path
import pandas as pd
from sklearn import metrics
def evaluate_iris(submission_file, test_gt_file, out_file):
df = pd.read_csv(test_gt_file)
test_gt = df['class'].to_list()
df = pd.read_csv(submission_file)
pred = df['class'].to_list()
prec = metrics.precision_score(test_gt, pred, average='weighted')
recall = metrics.recall_score(test_gt, pred, average='weighted')
f = metrics.f1_score(test_gt, pred, average='weighted')
out = {'metrics': {'Precision': prec,
'Recall': recall,
'F1': f}}
with open(out_file, 'w') as f:
json.dump(out, f)
if __name__ == "__main__":
# Run the algorithm on your local copy of the data by typing:
# python src/evaluation.py
# These are the default file paths (names) for input and output, so don't
# change them.
submission_file = str(Path('data')/'input'/'implementation_output')
test_gt_file = str(Path('data')/'input'/'ground_truth')
out_file = str(Path('data')/'output')
evaluate_iris(submission_file, test_gt_file, out_file)
|
As usual, we first import the required Python libraries (line 1-6). On line 9
the main evaluation function (evaluate_iris()) is defined. Inside this function,
the ground truth data is read (line 10) and converted to a list of class labels
(line 11). Next, the same is done for the implementation output (lines 13 and 14).
For this evaluation, we calculate precision, recall and F1-measure using sklearn
(lines 16-18). The metrics are put inside the data structure required by EYRA
Benchmark leaderboards:
{
  'metrics': {
      'Precision': 1.0,
      'Recall': 1.0,
      'F1': 1.0
  }
}
And written to a json file (lines 23 and 24).
When the src/evaluation.py script is run, we define paths to the input and
output data (lines 33-35). Finally, the evaluate_iris() function is called.
You can check that everything works as expected by inspecting the output file:
$ cat data/output
{"metrics": {"Precision": 1.0, "Recall": 1.0, "F1": 1.0}}
Specify the dependencies
Add all Python libraries needed to run the evaluation algorithm to requirements.txt.
For the demo we add pandas and scikit-learn.
Make sure the evaluation runs inside the Docker container
To actually evaluate performance of submissions, we need to run the evaluation
code inside a Docker container. In order to be able to do this, we change
src/run_evaluation.py to:
1 2 3 4 5 6 7 8 9 10 11 12 13 14 15 16 17 18 19 20 21 22 | from pathlib import Path
from evaluation import evaluate_iris
class Evaluation(object):
def run(self, submission_file, test_gt_file, out_file):
"""This is boilerplate. Delete the contents of this method and put your
own code here. Please do not change the class name (Evaluation),
the method name (run), or the arguments.
"""
evaluate_iris(submission_file, test_gt_file, out_file)
# Please do not change anything below
if __name__ == "__main__":
# These are the default file paths (names) for input and output
submission_file = Path('/')/'data'/'input'/'implementation_output'
test_gt_file = Path('/')/'data'/'input'/'ground_truth'
out_file = Path('/')/'data'/'output'
Evaluation().run(submission_file, test_gt_file, out_file)
|
The only lines we have to change in the boilerplate code are line 3 and line 12.
On line 3 we import the evaluate_iris() function from src/evaluation.py.
And on line 12, we call this function with the predefined arguments.
Note
For a real benchmark it is a good idea to replace the boilerplate documentation on lines 8-11 with something that helps users understand what is going on.
Test the Docker container
To build the Docker container and run the algorithm inside it, type
./test.sh. You get the following output:
$ ./test.sh
Sending build context to Docker daemon  37.38kB
Step 1/7 : FROM python:3.7-slim
3.7-slim: Pulling from library/python
1ab2bdfe9778: Pull complete
b5d689d9c40c: Pull complete
5b13ee99f0ea: Pull complete
d617973d7fa5: Pull complete
abfef9fe6f0b: Pull complete
Digest: sha256:5f83c6d40f9e9696d965785991e9b85e4baef189c7ad1078483d15a8657d6cc0
Status: Downloaded newer image for python:3.7-slim
---> f96c28b7013f
Step 2/7 : RUN mkdir -p /opt/src /input /output
---> Running in 162d645f6ab4
Removing intermediate container 162d645f6ab4
---> 6bfe8fb274ca
Step 3/7 : WORKDIR /opt/src
---> Running in 728e00c886c8
Removing intermediate container 728e00c886c8
---> 8e0b820ab7b7
Step 4/7 : COPY requirements.txt /opt/src/
---> 86c6dd868d39
Step 5/7 : RUN python -m pip install -r requirements.txt
---> Running in 5b6aa5bc84c6
Collecting pandas (from -r requirements.txt (line 1))
  Downloading https://files.pythonhosted.org/packages/7e/ab/ea76361f9d3e732e114adcd801d2820d5319c23d0ac5482fa3b412db217e/pandas-0.25.1-cp37-cp37m-manylinux1_x86_64.whl (10.4MB)
Collecting scikit-learn (from -r requirements.txt (line 2))
  Downloading https://files.pythonhosted.org/packages/9f/c5/e5267eb84994e9a92a2c6a6ee768514f255d036f3c8378acfa694e9f2c99/scikit_learn-0.21.3-cp37-cp37m-manylinux1_x86_64.whl (6.7MB)
Collecting python-dateutil>=2.6.1 (from pandas->-r requirements.txt (line 1))
  Downloading https://files.pythonhosted.org/packages/41/17/c62faccbfbd163c7f57f3844689e3a78bae1f403648a6afb1d0866d87fbb/python_dateutil-2.8.0-py2.py3-none-any.whl (226kB)
Collecting numpy>=1.13.3 (from pandas->-r requirements.txt (line 1))
  Downloading https://files.pythonhosted.org/packages/25/eb/4ecf6b13897391cb07a4231e9d9c671b55dfbbf6f4a514a1a0c594f2d8d9/numpy-1.17.1-cp37-cp37m-manylinux1_x86_64.whl (20.3MB)
Collecting pytz>=2017.2 (from pandas->-r requirements.txt (line 1))
  Downloading https://files.pythonhosted.org/packages/87/76/46d697698a143e05f77bec5a526bf4e56a0be61d63425b68f4ba553b51f2/pytz-2019.2-py2.py3-none-any.whl (508kB)
Collecting joblib>=0.11 (from scikit-learn->-r requirements.txt (line 2))
  Downloading https://files.pythonhosted.org/packages/cd/c1/50a758e8247561e58cb87305b1e90b171b8c767b15b12a1734001f41d356/joblib-0.13.2-py2.py3-none-any.whl (278kB)
Collecting scipy>=0.17.0 (from scikit-learn->-r requirements.txt (line 2))
  Downloading https://files.pythonhosted.org/packages/94/7f/b535ec711cbcc3246abea4385d17e1b325d4c3404dd86f15fc4f3dba1dbb/scipy-1.3.1-cp37-cp37m-manylinux1_x86_64.whl (25.2MB)
Collecting six>=1.5 (from python-dateutil>=2.6.1->pandas->-r requirements.txt (line 1))
  Downloading https://files.pythonhosted.org/packages/73/fb/00a976f728d0d1fecfe898238ce23f502a721c0ac0ecfedb80e0d88c64e9/six-1.12.0-py2.py3-none-any.whl
Installing collected packages: six, python-dateutil, numpy, pytz, pandas, joblib, scipy, scikit-learn
Successfully installed joblib-0.13.2 numpy-1.17.1 pandas-0.25.1 python-dateutil-2.8.0 pytz-2019.2 scikit-learn-0.21.3 scipy-1.3.1 six-1.12.0
Removing intermediate container 5b6aa5bc84c6
---> 99373d908df0
Step 6/7 : ADD src /opt/src/
---> d842ba9ce114
Step 7/7 : ENTRYPOINT "python" "-m" "run_evaluation"
---> Running in 54d46f982d81
Removing intermediate container 54d46f982d81
---> 4e928f9dc2fd
Successfully built 4e928f9dc2fd
Successfully tagged iris_eval:latest
Push the container to Docker Hub
If everything works as expected, you can push your container to Docker Hub:
./push.sh [version]
The ouput looks like:
$ ./push.sh 0.1.0
Sending build context to Docker daemon  37.38kB
Step 1/7 : FROM python:3.7-slim
---> f96c28b7013f
Step 2/7 : RUN mkdir -p /opt/src /input /output
---> Using cache
---> 6bfe8fb274ca
Step 3/7 : WORKDIR /opt/src
---> Using cache
---> 8e0b820ab7b7
Step 4/7 : COPY requirements.txt /opt/src/
---> Using cache
---> 86c6dd868d39
Step 5/7 : RUN python -m pip install -r requirements.txt
---> Using cache
---> 99373d908df0
Step 6/7 : ADD src /opt/src/
---> Using cache
---> d842ba9ce114
Step 7/7 : ENTRYPOINT "python" "-m" "run_evaluation"
---> Using cache
---> 4e928f9dc2fd
Successfully built 4e928f9dc2fd
Successfully tagged iris_eval:latest
Using tag: 0.1.0.
The push refers to repository [docker.io/eyra/iris_eval]
2a0fb79103de: Pushed
f25642385f8b: Pushed
27f89623cc9c: Pushed
21bb16c9b065: Pushed
1808163506f4: Mounted from eyra/iris_svm
acd5d8dd0a11: Mounted from eyra/iris_svm
e18984c86e86: Mounted from eyra/iris_svm
523a99e3c88d: Mounted from eyra/iris_svm
1c95c77433e8: Mounted from eyra/iris_svm
0.1.0: digest: sha256:492fbb2791b0613817150521b2e2597e6ca02ac07d0157f5f253765568f63a91 size: 2204
Tip
You need to login to Docker Hub (docker login) before you can push the container.
Tip
If you want to use the push.sh script in the EYRA Iris Demo github
repository,
you need to replace eyra with your own Docker Hub account.
Set the benchmark evaluation container
Set the benchmark’s evaluation container to eyra/iris_eval:0.1.0.
Todo
There is no form yet for benchmark organizers. The tutorial should be updated once it is clear how benchmark organizers should specify their evaluation container.